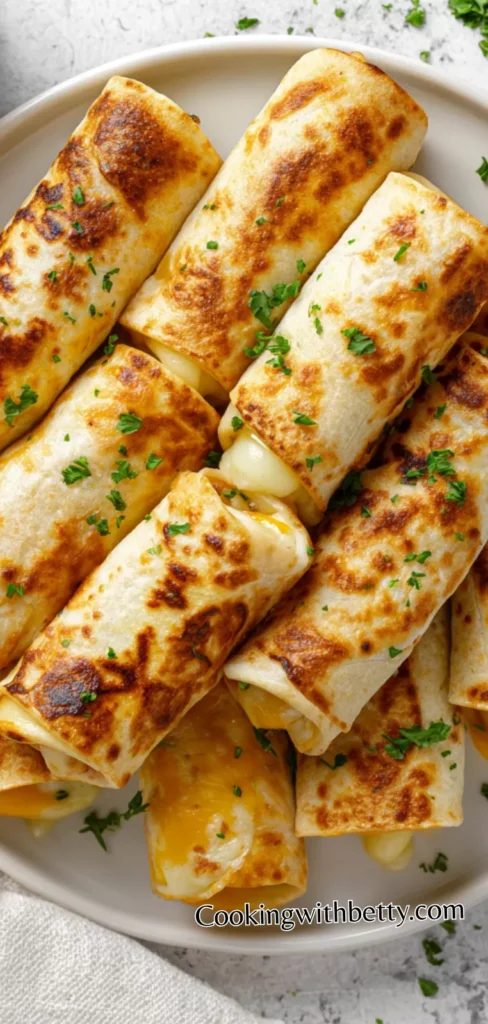
My kids absolutely love anything with cheese, but sometimes plain grilled cheese sandwiches in the pan get soggy or take too long to cook. Air Fryer Grilled Cheese Roll-Ups are one of my favorite quick snacks to make for the kids. In the air fryer, these roll-ups come out perfectly golden, crispy, and melty every single time. It’s a win-win, and I always make extra because they disappear faster than I can count!
They are crispy on the outside, gooey and cheesy on the inside, and cook so fast in the air fryer. Every time I make them, the whole house smells amazing, and the kids run to the kitchen because they know something delicious is ready. This recipe is perfect for busy school mornings, after-school snacks, or even a simple family lunch.
I have tried many different ways to make cheesy snacks, and this one is by far the easiest. I use simple sandwich bread, my favorite cheddar cheese, and a little butter on the outside. Always, I make sure to flatten the bread with a rolling pin so that it rolls perfectly and the cheese doesn’t spill out.

You can serve these roll-ups alone, some with ketchup for dipping, also with a side of fresh fruit or carrot sticks. They are flexible enough to be a snack, a lunchbox item, or even a fun appetizer for a small gathering. The kids love to dunk them in their favorite sauces, and it makes snack time even more exciting.
Its Perfect For:
- Quick after-school snack for busy afternoons
- Easy family lunch when you’re short on time
- Fun party appetizer for kids’ birthdays
- Cozy weekend comfort food at home
- Busy mornings when you want something cheesy and warm
Ingredients
- 8 slices of sandwich bread
- 4 slices of cheddar cheese (or cheese of your choice)
- 2 tablespoons butter, softened
- Optional: 1/2 teaspoon garlic powder or paprika for extra flavor
- Optional dipping sauce: ketchup, marinara, or ranch
Kitchen Equipment You’ll Need
- Air fryer (essential for crispiness)
- Rolling pin to flatten bread
- Sharp knife or pizza cutter
- Pastry brush for butter
- Bowl for optional toppings or spices
- Plate for serving
How to Make Air Fryer Grilled Cheese Roll-Ups
Step 1
Prepare the bread: Trim the crusts off the sandwich bread slices so that each piece can be easily rolled. Using a rolling pin, gently flatten each slice into a thin rectangle. This makes rolling easier and helps the cheese melt evenly.
Step 2
Assemble the roll-ups: Place a slice of cheese in the center of each flattened bread slice. Sprinkle with garlic powder or paprika if using, then carefully roll the bread tightly around the cheese. Make sure the seam is tucked underneath to prevent cheese from leaking during cooking.
Step 3
Butter the roll-ups: Lightly spread softened butter on the outside of each roll-up, coating all sides. This will create a golden, crispy exterior once air fried.
Step 4
Preheat the air fryer: Set your air fryer to 370°F (188°C) and let it preheat for 2–3 minutes. Preheating ensures the roll-ups cook evenly and get a nice crisp on the outside.
Step 5
Cook the roll-ups: Place the roll-ups seam-side down in the air fryer basket, leaving a little space between each one. Air fry for 8–10 minutes, turning halfway through, until the bread is golden brown and the cheese inside is melted and gooey.
Step 6
Serve immediately: Remove the roll-ups carefully from the air fryer and let them cool for a minute. Serve warm with your favorite dipping sauce on the side. Enjoy the melty, crispy, cheesy goodness with every bite!
Tips for Best Air Fryer Grilled Cheese Roll-Ups
- Flatten your bread: Always use a rolling pin to gently flatten each slice. This helps it roll better and prevents the cheese from leaking out.
- Butter evenly: Spread butter lightly and cover all sides of the roll-up. It makes the outside golden and crispy in the air fryer.
- Preheat your air fryer: Preheating ensures even cooking and a perfect crisp outside while the cheese melts inside.
- Don’t overcrowd: Place roll-ups with space in between in the air fryer basket. This prevents them from sticking and ensures even browning.
- Check halfway: Turn the roll-ups halfway through cooking. This keeps them golden all around without burning any side.
- Use sharp cheese slices: Thin, even slices melt better than thick chunks, giving a smooth, gooey inside.
- Serve immediately: These are best warm. Cheese gets firmer as they cool, so serve right after air frying for the best texture.
Optional Ingredients
- Garlic powder for a little extra flavor
- Paprika for mild smokiness
- Mozzarella cheese for a stretchy bite
- Jalapeño slices for a spicy twist
- Ham or turkey slices for protein
- Mustard or mayo inside for tangy flavor
How to Serve Air Fryer Grilled Cheese Roll-Ups?
I usually serve these roll-ups right out of the air fryer because they are warm, crispy, and gooey. I place them on a colorful plate so the kids get excited about snack time. Pairing them with ketchup, ranch, or even a homemade marinara sauce makes them extra tasty. I sometimes arrange them with little dipping bowls so each child can choose their favorite sauce. It turns a simple snack into a fun, interactive experience.
I like to make a small side of fresh fruits or vegetables when serving. Carrot sticks, apple slices, cucumber rounds, or cherry tomatoes go perfectly with the cheesy roll-ups. It balances the richness of the cheese and makes the snack feel wholesome without being too heavy. I also like to add a few crackers or pretzel sticks for extra crunch.
I also sometimes make a little dipping station for the kids, especially during parties or family movie nights. They love experimenting with different sauces, from honey mustard to spicy sriracha mayo. Everyone can dip, bite, and enjoy together, which makes snack time more social and playful. Sometimes, I even cut the roll-ups into smaller pieces so the kids can try different sauces without committing to a whole roll-up.
Is Air Fryer Grilled Cheese Roll-Ups Healthy?
These roll-ups are a better option than deep-fried snacks because they are cooked in an air fryer with minimal butter. Using whole-grain bread and moderate cheese can make them even healthier.
Of course, they are still a comfort snack, so portion control is key. When paired with fruits or veggies, they can be part of a balanced snack or meal without feeling too heavy.
Variations and Substitutions
- Ham & Cheese Roll-Ups: Add a thin slice of ham inside with cheese. Air fry the same way for a meaty, melty treat.
- Mozzarella & Tomato Roll-Ups: Use mozzarella and a thin slice of tomato inside. Sprinkle with basil for an Italian twist.
- Pepperoni Pizza Roll-Ups: Add mini pepperoni slices and shredded mozzarella. Serve with marinara sauce for dipping.
- Spicy Jalapeño Roll-Ups: Place jalapeño slices inside with cheddar. Great for kids who like a little heat.
- Breakfast Roll-Ups: Add cooked bacon or sausage and cheese. Perfect for a quick breakfast snack.
- Veggie Roll-Ups: Thinly sliced bell peppers or spinach with cheese make it lighter but still tasty.
- Cheddar & Cream Cheese Roll-Ups: Mix cream cheese with cheddar for an extra creamy center.
- Buffalo Chicken Roll-Ups: Add shredded cooked chicken tossed in buffalo sauce with cheese. Air fry until golden and melty.
How to Store, How to Reheat
You can store leftover roll-ups in an airtight container in the refrigerator for up to 2 days. Make sure they are completely cooled before storing, or the cheese can make them soggy.
To reheat, place them back in the air fryer at 350°F (175°C) for 3–4 minutes. This brings back the crispiness while warming the cheese inside. You can also use an oven or toaster oven for similar results.
Frequently Asked Questions About Air Fryer Grilled Cheese Roll-Ups
Can I make these without an air fryer?
Yes, you can bake them in a conventional oven at 400°F (200°C) for 8–12 minutes, or until golden brown. Place them on a parchment-lined baking sheet and check halfway through to make sure they are crisping evenly. They won’t get quite as crispy as in an air fryer but will still be delicious and melty inside.
Can I freeze them?
Absolutely! Roll them up, wrap individually in plastic wrap or foil, and store in an airtight container or freezer bag. When ready, air fry straight from frozen at 350°F (175°C) for 5–7 minutes, turning halfway through. This makes it easy to have a quick snack ready anytime.
Can I use different bread?
Yes, you can use whole wheat, multigrain, sandwich thins, or even gluten-free bread. Flatten them gently with a rolling pin for the best rolling results. The type of bread may slightly change cooking time, so keep an eye on them to avoid burning.
Can I use shredded cheese?
Yes, shredded cheese works perfectly, but make sure the seam of the bread is tucked well to prevent the cheese from spilling out. You might need a slightly longer cooking time if using larger amounts of shredded cheese. Mixing shredded cheese with a little cream cheese can also help it stay inside while melting.

Air Fryer Grilled Cheese Roll-Ups
Ingredients
- 8 slices of sandwich bread
- 4 slices of cheddar cheese or cheese of your choice
- 2 tablespoons butter softened
- Optional: 1/2 teaspoon garlic powder or paprika for extra flavor
- Optional dipping sauce: ketchup marinara, or ranch
Instructions
- Prepare the bread: Trim the crusts off the sandwich bread slices so that each piece can be easily rolled. Using a rolling pin, gently flatten each slice into a thin rectangle. This makes rolling easier and helps the cheese melt evenly.
- Assemble the roll-ups: Place a slice of cheese in the center of each flattened bread slice. Sprinkle with garlic powder or paprika if using, then carefully roll the bread tightly around the cheese. Make sure the seam is tucked underneath to prevent cheese from leaking during cooking.
- Butter the roll-ups: Lightly spread softened butter on the outside of each roll-up, coating all sides. This will create a golden, crispy exterior once air fried.
- Preheat the air fryer: Set your air fryer to 370°F (188°C) and let it preheat for 2–3 minutes. Preheating ensures the roll-ups cook evenly and get a nice crisp on the outside.
- Cook the roll-ups: Place the roll-ups seam-side down in the air fryer basket, leaving a little space between each one. Air fry for 8–10 minutes, turning halfway through, until the bread is golden brown and the cheese inside is melted and gooey.
- Serve immediately: Remove the roll-ups carefully from the air fryer and let them cool for a minute. Serve warm with your favorite dipping sauce on the side. Enjoy the melty, crispy, cheesy goodness with every bite!


Leave a Reply