Making these pierogies is quick and satisfying, but what makes them special in my kitchen is how they bring people together. The Costco Pierogi Recipe is one of those easy comfort dishes that feel homemade without the extra work. Pierogies are soft dumplings filled with mashed potatoes, cheese, and sometimes onions — and when you cook them right, they turn beautifully golden on the outside and stay creamy inside. With a little butter, onion, and love, you can make this store-bought favorite taste like something your grandma spent hours on. I love serving them when I want something warm, simple, and filling. The crispy edges, buttery aroma, and creamy filling always make everyone smile.
I have tried making them several ways — boiled, baked, air-fried, and pan-fried — but nothing beats frying them in butter with caramelized onions until they’re golden and slightly crisp. Always use real butter and fresh onions; they make all the difference.

You can serve these pierogies with sour cream, some chopped herbs, and also with bacon bits or a drizzle of melted cheese. They’re versatile, comforting, and fit almost any meal of the day.
It’s Perfect For:
- Cozy family dinners on chilly nights
- Weekend brunches with a twist
- Movie nights or easy comfort meals
- Potlucks and gatherings with friends
- A filling side dish for roasted meats or grilled sausages
Ingredients
- 1 package Costco frozen pierogies (about 2 lbs, any flavor – potato & cheese is most popular)
- 2 tablespoons butter
- 1 medium onion, finely sliced
- 1 tablespoon olive oil
- 1/4 cup sour cream (for serving)
- 2 tablespoons chopped green onions or chives (optional)
- Salt and pepper to taste
- Optional: cooked bacon bits or caramelized onions for garnish
Kitchen Equipment You’ll Need
- Large pot for boiling pierogies
- Nonstick or cast iron skillet
- Slotted spoon
- Wooden spoon or tongs
- Measuring cups and spoons
- Serving plate or platter
How to Make Costco Pierogi
Step 1
Boil the pierogies: Bring a large pot of salted water to a rolling boil. Gently drop in the frozen pierogies, being careful not to overcrowd the pot. Stir occasionally to prevent sticking. Boil for 5–6 minutes, or until the pierogies float to the surface — that’s the sign they’re perfectly cooked. Remove them with a slotted spoon and set aside on a plate.
Step 2
Prepare the onion butter: In a large skillet, melt the butter with olive oil over medium heat. Add the sliced onions and cook slowly, stirring often, until they turn golden brown and fragrant — about 10–12 minutes. This step adds a rich, savory flavor that pairs beautifully with the pierogies.
Step 3
Pan-fry the pierogies: Once the onions are caramelized, push them to the side of the skillet. Add the boiled pierogies in a single layer. Fry for 3–5 minutes per side, or until golden and lightly crispy. If the pan looks dry, add a little more butter or olive oil.
Step 4
Season and serve: Season the pierogies lightly with salt and pepper, then toss them with the caramelized onions so they’re fully coated in buttery goodness. Transfer to a serving plate and top with a dollop of sour cream. Sprinkle green onions or bacon bits on top for an extra indulgent touch.
Step 5
Optional oven method: If you prefer baking, preheat your oven to 400°F (200°C). Arrange frozen pierogies on a parchment-lined baking sheet, brush lightly with oil or melted butter, and bake for 18–20 minutes, flipping halfway through. They’ll come out crispy and golden.
Tips for the Best Costco Pierogi
- Don’t overcrowd the pot: Cook pierogies in small batches so they don’t stick together or lose shape while boiling.
- Pat them dry before frying: Once boiled, lightly pat each pierogi with a paper towel — this step helps them crisp up perfectly in the pan.
- Combine butter and oil: Mixing butter with a little olive oil prevents burning while still giving that rich buttery flavor.
- Take your time with onions: Caramelize onions slowly over medium-low heat for sweetness and depth of flavor. Patience pays off here.
- Flip gently: When frying, use tongs or a soft spatula to flip so the dough doesn’t tear.
- Enhance flavor with herbs: Fresh dill, parsley, or chives add brightness and a hint of freshness to the dish.
- Keep some extra butter on hand: Pierogies soak up butter fast, so I always keep a little more ready to toss in for that glossy finish.
Optional Ingredients
- 1/4 cup shredded cheddar or mozzarella
- 1 teaspoon garlic powder or roasted garlic paste
- 2 tablespoons chopped dill or parsley
- 2 tablespoons crispy bacon bits
- 1/4 cup caramelized onions or sautéed mushrooms
- A light drizzle of truffle oil or olive oil before serving

How to Serve Costco Pierogi
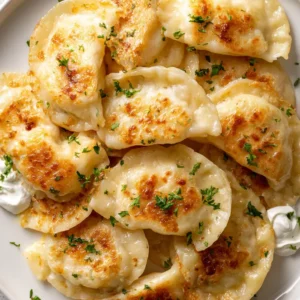
I love serving pierogies family-style — piled high on a platter, glistening with butter and caramelized onions. I usually top them with a dollop of sour cream in the center, surrounded by a sprinkle of chives or fresh dill. The buttery sheen and golden color make them irresistible, especially when served warm right off the pan.
I like to serve them as a main dish with a crisp green salad, roasted vegetables, or grilled sausage on the side. The balance between the soft, creamy filling and the crispy exterior makes the meal feel indulgent yet simple. If I’m hosting guests, I add small bowls of toppings like shredded cheese, crumbled bacon, and sautéed mushrooms so everyone can personalize their own plate.
When I make pierogies for my family, it’s often a comfort-night meal — I’ll serve them with a pot of soup or even just a side of steamed broccoli. The best part is watching everyone reach for seconds. The warm butter aroma fills the house, and that cozy, homemade feeling makes the meal special every single time.
Is Costco Pierogi Healthy?
Costco pierogies can be part of a balanced meal when eaten in moderation. They’re filling and rich in carbohydrates, making them a great comfort food, but since they contain cheese and butter, they can also be higher in sodium and fat.
If you want to make them healthier, try boiling or air-frying instead of pan-frying, and serve them with veggies or a salad. Using a light sour cream or Greek yogurt as a dip is another easy way to reduce calories without sacrificing flavor.
Variations and Substitutions
- Bacon and Onion Pierogies: Add crispy bacon and sweet caramelized onions for a smoky, rich twist that pairs perfectly with sour cream.
- Cheesy Pierogies: Sprinkle mozzarella or cheddar on top and broil for a few minutes until melted and bubbly.
- Spicy Pierogies: Toss with hot sauce, red pepper flakes, or sriracha butter for a flavorful kick.
- Veggie Pierogies: Add sautéed mushrooms, spinach, or bell peppers for extra nutrition and color.
- Sweet Pierogies: Drizzle with honey or serve with fruit preserves for a dessert-style twist.
- Garlic Butter Pierogies: Toss in a mixture of melted butter, garlic, and parsley for an aromatic finish.
- Loaded Pierogies: Top with cheese, green onions, sour cream, and bacon bits — just like loaded mashed potatoes!
- Vegan Pierogies: Use dairy-free butter and plant-based sour cream. Skip cheese and go heavy on herbs for fresh flavor.
How to Store and Reheat
Store any leftover pierogies in an airtight container once cooled completely. They’ll keep well in the refrigerator for up to 3 days. To freeze, place them on a baking sheet first to avoid sticking, then transfer to a freezer-safe bag for up to 2 months.
To reheat, pan-fry them in a little butter until they’re crisp again, or use the air fryer for 6–8 minutes at 375°F. If you prefer them soft, microwave covered for 1–2 minutes. Avoid overcooking, as they can become tough or dry.
Frequently Asked Questions About Costco Pierogi
Do I need to thaw Costco pierogies before cooking?
No, you can cook them straight from frozen. Just boil or bake them directly — they’ll soften as they cook and turn out perfect every time.
Can I cook pierogies in the oven instead of frying?
Yes! Brush them lightly with butter or oil and bake at 400°F (200°C) for about 18–20 minutes, flipping halfway through. This method gives them a crisp outside without extra oil.
What toppings go best with pierogies?
The most classic choices are sour cream, caramelized onions, chives, and bacon bits. But you can also try melted cheese, sautéed mushrooms, or even a drizzle of garlic butter for extra flavor.
How can I make them crispy without using too much butter?
Try air-frying them at 400°F for 10–12 minutes. They’ll turn out crunchy and golden with very little oil, which keeps them lighter but still delicious.
Costco Pierogi
Ingredients
- 1 package Costco frozen pierogies about 2 lbs, any flavor – potato & cheese is most popular
- 2 tablespoons butter
- 1 medium onion finely sliced
- 1 tablespoon olive oil
- 1/4 cup sour cream for serving
- 2 tablespoons chopped green onions or chives optional
- Salt and pepper to taste
- Optional: cooked bacon bits or caramelized onions for garnish
Instructions
- Boil the pierogies: Bring a large pot of salted water to a rolling boil. Gently drop in the frozen pierogies, being careful not to overcrowd the pot. Stir occasionally to prevent sticking. Boil for 5–6 minutes, or until the pierogies float to the surface — that’s the sign they’re perfectly cooked. Remove them with a slotted spoon and set aside on a plate.
- Prepare the onion butter: In a large skillet, melt the butter with olive oil over medium heat. Add the sliced onions and cook slowly, stirring often, until they turn golden brown and fragrant — about 10–12 minutes. This step adds a rich, savory flavor that pairs beautifully with the pierogies.
- Pan-fry the pierogies: Once the onions are caramelized, push them to the side of the skillet. Add the boiled pierogies in a single layer. Fry for 3–5 minutes per side, or until golden and lightly crispy. If the pan looks dry, add a little more butter or olive oil.
- Season and serve: Season the pierogies lightly with salt and pepper, then toss them with the caramelized onions so they’re fully coated in buttery goodness. Transfer to a serving plate and top with a dollop of sour cream. Sprinkle green onions or bacon bits on top for an extra indulgent touch.
- Optional oven method: If you prefer baking, preheat your oven to 400°F (200°C). Arrange frozen pierogies on a parchment-lined baking sheet, brush lightly with oil or melted butter, and bake for 18–20 minutes, flipping halfway through. They’ll come out crispy and golden.
Leave a Reply