I like light tropical desserts after dinner, but heavy sweets in hot weather is not something I enjoy, and Thai Mango Sticky Rice is perfect because it is creamy, fruity, and not too rich and it feels refreshing and comforting at the same time. This Thai Mango Sticky Rice is one of those desserts that feels soft, warm, and comforting in every bite. It brings together creamy coconut rice and sweet, juicy mango in a way that tastes simple but very special. I love how it looks elegant on a plate, yet it is actually very easy to prepare at home. The balance of sweet, salty, and creamy flavors makes it a dessert I always come back to when I want something gentle and satisfying.
I have made this dessert many times for family gatherings. I use ripe mangoes, coconut milk, and sticky rice always because these simple ingredients create the perfect balance of flavor without needing anything complicated or expensive.

You can serve it warm or at room temperature, some people also enjoy it chilled, also with extra coconut sauce or fresh fruit on the side.
Its Perfect For:
- Summer desserts after meals
- Family gatherings and celebrations
- Light sweet cravings in the evening
- Special Thai-inspired dinner nights
- Easy homemade dessert for guests
Ingredients
- 1 cup glutinous (sticky) rice
- 1 1/2 cups coconut milk
- 1/3 cup sugar
- 1/2 teaspoon salt
- 2 ripe mangoes, peeled and sliced
- 1 tablespoon toasted sesame seeds or mung beans (optional, for topping)
- 1 teaspoon vanilla extract (optional, for extra aroma)
- 1 tablespoon cornstarch mixed with 2 tablespoons water (optional, for thicker coconut sauce)
Kitchen Equipment You’ll Need
- Medium saucepan for coconut sauce
- Steamer or steaming basket
- Mixing bowl for combining rice and milk
- Sharp knife for slicing mangoes
- Wooden spoon or spatula
- Measuring cups and spoons
- Serving plate or dessert bowl
How to make Thai Mango Sticky Rice
Step 1
Soak and prepare the rice: Rinse the sticky rice thoroughly under cold water until the water runs mostly clear. This helps remove excess starch so the rice doesn’t become overly gummy. Soak the rice in clean water for at least 3–4 hours, or overnight for best texture. After soaking, drain it completely before cooking.
Step 2
Steam the rice: Place the soaked rice into a steamer lined with cheesecloth or a clean cloth. Steam over medium heat for about 20–25 minutes, or until the rice becomes soft, tender, and slightly translucent. Halfway through steaming, gently flip or stir the rice once so it cooks evenly.
Step 3
Make the coconut sauce: While the rice is steaming, pour coconut milk into a saucepan over low heat. Add sugar and salt, stirring slowly until everything fully dissolves. Do not let it boil too hard—just gently heat it so it stays creamy and smooth. If you want extra aroma, add vanilla extract at this stage.
Step 4
Combine rice and coconut milk: Once the sticky rice is cooked, transfer it into a large bowl while it is still hot. Immediately pour most of the warm coconut milk mixture over the rice. Mix gently but thoroughly so every grain absorbs the sweet coconut flavor. Cover and let it sit for 20–30 minutes so the rice fully soaks up the sauce and becomes rich and creamy.
Step 5
Prepare thick coconut topping (optional): Take the remaining coconut sauce and simmer it on low heat. If you prefer a thicker, more dessert-style drizzle, stir in the cornstarch slurry and cook for 2–3 minutes until slightly thickened and glossy. Remove from heat and set aside.
Step 6
Slice the mangoes: Peel the ripe mangoes carefully and slice them into thin, even pieces. Make sure the mangoes are sweet, soft, and fragrant, as this balances the creamy rice perfectly.
Step 7
Assemble the dish: Spoon a generous portion of coconut sticky rice onto a plate. Arrange fresh mango slices beside it in a fan shape or neat stack. Drizzle the thick coconut sauce over the top and finish with toasted sesame seeds or mung beans for a light crunch. Let it rest briefly before serving so the flavors settle, then serve slightly warm or at room temperature for the best taste.
Tips for Perfect Thai Mango Sticky Rice
- Always soak the sticky rice properly
Soaking helps the grains cook evenly.
It also gives a softer, chewy texture. - Use full-fat coconut milk
It creates a rich creamy flavor.
Light versions will taste less smooth. - Do not boil coconut milk too hard
Gentle heat keeps it silky.
Boiling can make it split or separate. - Choose very ripe mangoes
Sweet mangoes balance the salty rice.
Soft texture makes every bite perfect. - Mix rice while it is still hot
Hot rice absorbs coconut milk better.
It creates deeper flavor inside grains. - Let rice rest before serving
Resting improves texture and creaminess.
Flavors become more balanced over time. - Taste coconut mixture before mixing
Adjust sugar or salt if needed.
Every coconut milk brand is different.
Optional Ingredients
- Vanilla extract for aroma
- Toasted sesame seeds for crunch
- Toasted mung beans for texture
- Pandan leaves for fragrance
- Extra coconut cream drizzle
- A pinch of palm sugar for deeper sweetness

How to serve Thai Mango Sticky Rice?
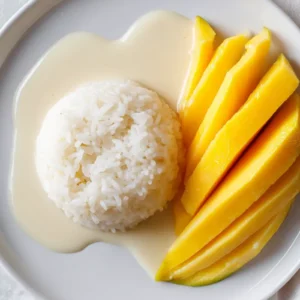
I always like to serve this dessert in a way that feels soft, fresh, and visually beautiful because it is just as much about appearance as it is about taste. I usually place a warm scoop of sticky rice slightly off-center on the plate, then arrange the mango slices in a fan shape beside it. The bright yellow mango next to the white coconut rice creates a natural contrast that already looks very inviting before anyone even takes a bite.
I also like to add a generous spoon of thick coconut sauce over the rice so it slowly drips down the sides. This makes the dessert look glossy and rich, almost like something you would see in a restaurant. Sometimes I sprinkle toasted sesame seeds or mung beans on top to add a little texture, and it gives a soft crunch that balances the creamy rice.
When serving guests, I sometimes prepare it in small individual bowls instead of one big plate. This makes it feel more personal and easier to enjoy. For a more refreshing presentation, I chill the mango slightly before slicing it, which adds a cool contrast to the creamy rice. Every serving style brings a slightly different feeling, but all of them highlight the same tropical sweetness.
Is Thai Mango Sticky Rice healthy?
Thai Mango Sticky Rice is moderately healthy when enjoyed in reasonable portions. It is made with natural ingredients like mango, coconut milk, and sticky rice, which provide energy, fiber, and some vitamins. However, it is also rich in natural sugars and fats, so it works best as an occasional dessert rather than a daily meal.
The mango brings vitamin C and natural sweetness, while coconut milk provides richness and a creamy texture. If you reduce added sugar slightly, it can become a lighter dessert without losing its signature taste. Balance is the key when enjoying it.
Variations and Substitutions
- Pandan Sticky Rice Version
Add pandan leaves while steaming rice
Gives a light green color and aroma
More fragrant and traditional Thai style
Very common in street desserts - Coconut Cream Rich Version
Replace milk with thick coconut cream
Creates a much richer texture
More indulgent and heavy dessert
Best for special occasions - Mango Berry Fusion
Add strawberries or blueberries
Creates sweet and tangy balance
Makes the dessert more colorful
Perfect for summer serving - Sugar-Free Light Version
Use stevia or honey instead of sugar
Reduces refined sugar intake
Still creamy and satisfying
Better for light diets - Black Sticky Rice Version
Use black glutinous rice instead
Nutty flavor with chewy texture
More traditional and earthy taste
Popular in Southeast Asia - Mini Dessert Cups
Serve in small glass cups
Elegant individual presentation
Perfect for parties and catering
Easy to portion and serve - Salted Caramel Twist
Add caramel drizzle on top
Mixes sweet, salty, and creamy
More dessert-like Western fusion
Very rich and indulgent - Tropical Fruit Mix
Add pineapple or papaya slices
Adds freshness and acidity
Balances creamy coconut flavor
Great for summer gatherings
How to store, How to reheat
To store Thai Mango Sticky Rice, keep the sticky rice and mango in separate airtight containers. Store them in the refrigerator for up to 2 days to maintain freshness. This prevents the mango from becoming too soft and keeps the rice texture stable.
To reheat the sticky rice, gently steam it or microwave it with a small splash of coconut milk. This helps restore its softness and creamy texture. Always add fresh mango after reheating so the flavor stays bright and fresh.
Frequently Asked Questions About Thai Mango Sticky Rice
Can I prepare Thai Mango Sticky Rice in advance?
Yes, you can prepare the sticky rice and coconut sauce ahead of time.
It actually helps the flavors develop more deeply.
Just store everything separately and add mango fresh before serving.
What kind of rice gives the best result?
Glutinous sticky rice is the only correct choice.
It becomes soft, chewy, and slightly sticky after cooking.
Regular rice will not absorb coconut milk properly.
Can I use frozen mango instead of fresh?
Yes, but fresh mango is always better.
Frozen mango becomes softer and less firm when thawed.
If using frozen, drain excess liquid before serving.
Why is my sticky rice still hard after cooking?
It was likely not soaked long enough before steaming.
Soaking allows the grains to absorb water evenly.
Without it, the center stays firm and undercooked.
Thai Mango Sticky Rice
Ingredients
- 1 cup glutinous sticky rice
- 1 1/2 cups coconut milk
- 1/3 cup sugar
- 1/2 teaspoon salt
- 2 ripe mangoes peeled and sliced
- 1 tablespoon toasted sesame seeds or mung beans optional, for topping
- 1 teaspoon vanilla extract optional, for extra aroma
- 1 tablespoon cornstarch mixed with 2 tablespoons water optional, for thicker coconut sauce
Instructions
- Soak and prepare the rice: Rinse the sticky rice thoroughly under cold water until the water runs mostly clear. This helps remove excess starch so the rice doesn’t become overly gummy. Soak the rice in clean water for at least 3–4 hours, or overnight for best texture. After soaking, drain it completely before cooking.
- Steam the rice: Place the soaked rice into a steamer lined with cheesecloth or a clean cloth. Steam over medium heat for about 20–25 minutes, or until the rice becomes soft, tender, and slightly translucent. Halfway through steaming, gently flip or stir the rice once so it cooks evenly.
- Make the coconut sauce: While the rice is steaming, pour coconut milk into a saucepan over low heat. Add sugar and salt, stirring slowly until everything fully dissolves. Do not let it boil too hard—just gently heat it so it stays creamy and smooth. If you want extra aroma, add vanilla extract at this stage.
- Combine rice and coconut milk: Once the sticky rice is cooked, transfer it into a large bowl while it is still hot. Immediately pour most of the warm coconut milk mixture over the rice. Mix gently but thoroughly so every grain absorbs the sweet coconut flavor. Cover and let it sit for 20–30 minutes so the rice fully soaks up the sauce and becomes rich and creamy.
- Prepare thick coconut topping (optional): Take the remaining coconut sauce and simmer it on low heat. If you prefer a thicker, more dessert-style drizzle, stir in the cornstarch slurry and cook for 2–3 minutes until slightly thickened and glossy. Remove from heat and set aside.
- Slice the mangoes: Peel the ripe mangoes carefully and slice them into thin, even pieces. Make sure the mangoes are sweet, soft, and fragrant, as this balances the creamy rice perfectly.
- Assemble the dish: Spoon a generous portion of coconut sticky rice onto a plate. Arrange fresh mango slices beside it in a fan shape or neat stack. Drizzle the thick coconut sauce over the top and finish with toasted sesame seeds or mung beans for a light crunch. Let it rest briefly before serving so the flavors settle, then serve slightly warm or at room temperature for the best taste.


Leave a Reply