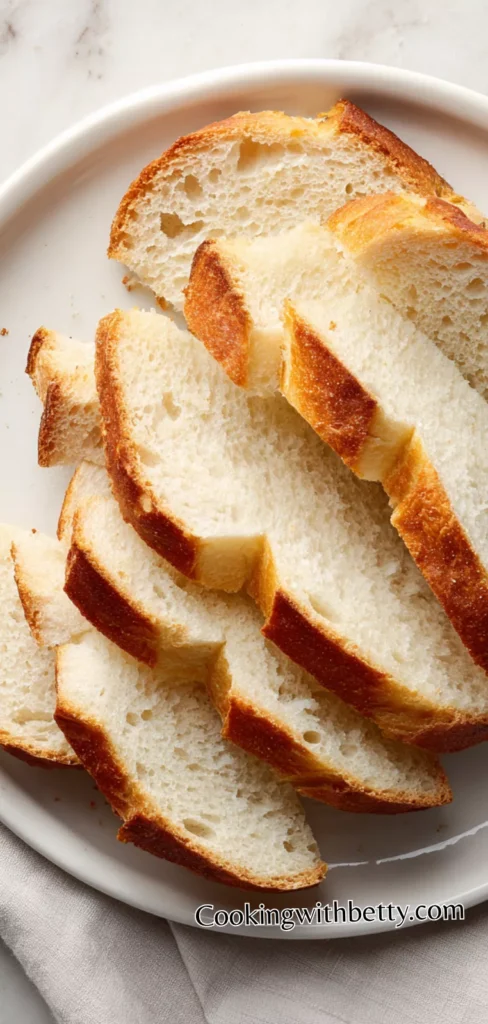
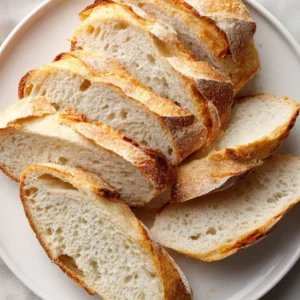
My husband usually prefers store-bought bread because he thinks homemade bread takes too long, but in reality, this Wegmans Tuscan Bread Recipe is easy to prepare at home and tastes much fresher and more flavorful than anything from the store, and once he tried it warm from the oven, he completely changed his mind and now requests it regularly. Wegmans Tuscan Bread Recipe is a rustic, simple, and comforting homemade bread inspired by traditional Italian baking. It has a crisp golden crust on the outside and a soft, airy interior on the inside, making it perfect for everyday meals.
This bread is known for its clean flavor, minimal ingredients, and slightly chewy texture that pairs beautifully with both savory and sweet dishes. What makes it special is its simplicity—no complicated steps, just basic pantry ingredients that come together to create something truly satisfying.
I have tried many bread recipes over the years, but this one remains one of my favorites because of its reliability and soft crumb, and I use simple ingredients, careful kneading, and proper resting time always to achieve that perfect bakery-style result.

You can serve Wegmans Tuscan Bread Recipe with soups, some fresh salads, also with olive oil and balsamic vinegar for dipping, or alongside pasta dishes and grilled meats for a complete and satisfying meal. It also works beautifully as toasted slices topped with butter, garlic spread, or even a light drizzle of honey for a contrast of flavors.
Its Perfect For:
- Family dinners where fresh bread is appreciated
- Serving with soups and stews
- Sandwiches and toasted bread meals
- Holiday or special gatherings
- Everyday homemade baking practice
Ingredients
- 3 1/2 cups all-purpose flour
- 1 1/2 teaspoons salt
- 1 teaspoon sugar
- 1 packet (2 1/4 teaspoons) active dry yeast
- 1 1/4 cups warm water (about 110°F / 45°C)
- 1 tablespoon olive oil
- Cornmeal (for dusting)
Kitchen Equipment You’ll Need
- Large mixing bowl
- Measuring cups and spoons
- Wooden spoon or dough whisk
- Clean kitchen towel or plastic wrap
- Baking sheet or tray
- Parchment paper or cornmeal
- Oven with temperature control
- Cooling rack
How to Make Wegmans Tuscan Bread
Step 1
Activate the yeast: In a small bowl, combine warm water, sugar, and yeast. Stir gently and let it sit for 5–10 minutes until the mixture becomes foamy and bubbly. This step ensures the yeast is active and will help the bread rise properly.
Step 2
Prepare the dough: In a large mixing bowl, whisk together the flour and salt. Pour in the activated yeast mixture along with the olive oil. Mix everything together using a wooden spoon or your hands until a rough dough forms and all the flour is incorporated.
Step 3
Knead the dough: Transfer the dough onto a lightly floured surface. Knead for about 8–10 minutes, pressing and folding the dough until it becomes smooth, elastic, and slightly tacky but not sticky. Add a little flour if needed, but avoid adding too much to keep the bread soft inside.
Step 4
First rise: Place the dough in a lightly oiled bowl, turning it once so the surface is coated. Cover with a clean kitchen towel or plastic wrap and let it rise in a warm place for 1 to 1 1/2 hours, or until it has doubled in size.
Step 5
Shape the loaf: Punch down the risen dough gently to release air. Shape it into a round or oval loaf, keeping the surface slightly tight for a nice crust. Place it on a baking sheet dusted with cornmeal to prevent sticking and to give a rustic texture to the bottom.
Step 6
Second rise: Cover the shaped dough loosely and let it rise again for 30–40 minutes until puffy. This second rise helps develop a light and airy interior.
Step 7
Bake the bread: Preheat your oven to 425°F (220°C). If desired, make a few shallow slashes on top of the dough with a sharp knife. Bake for 30–35 minutes until the crust is golden brown and the loaf sounds hollow when tapped on the bottom. For an extra crispy crust, you can place a small pan of water in the oven to create steam.
Step 8
Cool and serve: Remove the bread from the oven and let it cool on a wire rack for at least 20 minutes before slicing. This allows the interior to set properly and enhances the flavor. Slice and enjoy with olive oil, butter, or your favorite dishes.
Helpful Tips
- Use warm water, not hot
The yeast activates best in warm water around 110°F.
If the water is too hot, it can kill the yeast.
This step ensures proper rising and soft texture. - Allow enough rising time
Do not rush the proofing stage of the dough.
Letting it double in size improves flavor and texture.
A warm environment helps the dough rise better. - Knead the dough properly
Kneading develops gluten, which gives structure to the bread.
Work the dough until it becomes smooth and elastic.
Under-kneaded dough may result in dense bread. - Avoid adding too much flour
Adding excess flour makes the bread dry and heavy.
Only use extra flour if the dough is very sticky.
The dough should remain slightly soft and manageable. - Create steam in the oven
Place a small pan of water in the oven while baking.
Steam helps create a crisp crust on the outside.
It also improves the overall texture of the bread. - Score the dough before baking
Making shallow cuts on top allows the bread to expand.
It also gives a beautiful artisan-style appearance.
Use a sharp knife or blade for clean cuts. - Let the bread cool before slicing
Cutting too early can make the inside gummy.
Cooling helps the structure set properly.
Always allow at least 20 minutes before slicing.
Optional Ingredients
- Olive oil for richer flavor
- Honey for a slight sweetness
- Garlic powder for savory aroma
- Herbs like rosemary or thyme
- Milk instead of water for softer crumb
- Butter brushed on top for extra richness
How to serve Wegmans Tuscan Bread?
I like to serve this bread warm straight from the oven, sliced thick or thin depending on preference, and arranged neatly on a wooden board or basket lined with a cloth to keep it soft and inviting. Serving it warm enhances its aroma and brings out the subtle flavors of the crust and crumb, making each bite more enjoyable and comforting.
For more complete meals, I often pair this bread with hearty soups, pasta dishes, or salads, where it can be used to scoop, dip, or soak up sauces and broths. Adding a small dish of olive oil mixed with balsamic vinegar, herbs, or even garlic creates a simple dipping option that elevates the overall dining experience and adds a touch of authenticity.
When hosting guests or family gatherings, I prefer to present the bread as part of a shared table spread alongside cheeses, olives, cured meats, and spreads. This allows everyone to enjoy it in different ways, whether as a side, a base for toppings, or simply enjoyed on its own. Its versatility makes it suitable for both casual meals and more formal occasions, always bringing warmth and satisfaction to the table.
Is Wegmans Tuscan Bread healthy?
Wegmans Tuscan Bread Recipe can be considered moderately healthy when consumed in balanced portions, as it uses simple, natural ingredients without artificial additives or preservatives. It mainly provides carbohydrates for energy, along with small amounts of protein from the flour, making it a good source of quick energy in a daily diet.
To make it healthier, you can adjust the recipe by using whole wheat flour, reducing added sugar, or pairing it with nutrient-rich foods like vegetables, lean proteins, and healthy fats. When enjoyed as part of a balanced meal, it can fit well into a wholesome eating pattern.
Variations and Substitutions
- Whole wheat version
Replace half or all of the all-purpose flour with whole wheat flour.
This adds fiber and a nuttier flavor to the bread.
The texture will be slightly denser but more nutritious.
You may need extra water for hydration. - Garlic herb bread
Add minced garlic and dried herbs into the dough.
Rosemary and thyme work especially well together.
This creates a fragrant and savory loaf.
Perfect for pairing with Italian meals. - Cheesy Tuscan bread
Mix in shredded parmesan or mozzarella into the dough.
The cheese melts and adds richness inside the bread.
You can also sprinkle cheese on top before baking.
Great for a more indulgent variation. - Olive bread
Fold in chopped olives during the mixing stage.
Green or black olives both work well.
This gives a salty and tangy Mediterranean flavor.
Ideal for serving with salads and antipasti. - Milk-based dough
Replace water with warm milk for a softer crumb.
Milk adds richness and a slightly sweet taste.
The bread becomes more tender and light.
Best for sandwiches or toast. - Sweet version
Add a bit more sugar or honey to the dough.
This creates a mildly sweet bread flavor.
It pairs well with butter or jam.
Good for breakfast or snacks. - Seeded bread
Add sesame seeds, sunflower seeds, or flaxseeds.
Seeds provide extra crunch and nutrition.
They can be mixed in or sprinkled on top.
Adds texture and visual appeal. - Gluten-free adaptation
Use a gluten-free flour blend designed for bread.
Add a binding agent like xanthan gum if needed.
The texture will differ but still enjoyable.
Follow specific gluten-free baking instructions.
How to store, How to reheat
To store Wegmans Tuscan Bread Recipe, allow the bread to cool completely before placing it in an airtight container or wrapping it in plastic wrap or foil. Keep it at room temperature for up to 2–3 days. For longer storage, you can freeze the bread by wrapping it tightly and placing it in a freezer-safe bag, where it can last for up to 2 months without losing much quality.
To reheat, you can warm slices in a toaster for a crisp texture or place the whole loaf in the oven at a low temperature (around 300°F / 150°C) for about 10–15 minutes. If frozen, let the bread thaw at room temperature first before reheating. Reheating helps restore the fresh-baked aroma and improves the softness and crust.
Frequently Asked Questions About Wegmans Tuscan Bread
Can I make this bread without yeast?
No, yeast is essential for the rise and structure of this bread.
It is what creates the airy interior and soft crumb.
Without yeast, the bread will be dense and flat.
Why didn’t my bread rise properly?
This is usually due to inactive or expired yeast.
Water that is too hot or too cold can also affect rising.
Make sure the dough is kept in a warm environment during proofing.
Can I use instant yeast instead of active dry yeast?
Yes, instant yeast can be used in the same amount.
It can be mixed directly with dry ingredients without activation.
This may slightly reduce preparation time and simplify the process.
How do I know when the bread is fully baked?
The crust should be golden brown and firm to the touch.
When tapped on the bottom, it should sound hollow.
You can also check the internal temperature if needed for accuracy.
Wegmans Tuscan Bread
Ingredients
- 3 1/2 cups all-purpose flour
- 1 1/2 teaspoons salt
- 1 teaspoon sugar
- 1 packet 2 1/4 teaspoons active dry yeast
- 1 1/4 cups warm water about 110°F / 45°C
- 1 tablespoon olive oil
- Cornmeal for dusting
Instructions
- Activate the yeast: In a small bowl, combine warm water, sugar, and yeast. Stir gently and let it sit for 5–10 minutes until the mixture becomes foamy and bubbly. This step ensures the yeast is active and will help the bread rise properly.
- Prepare the dough: In a large mixing bowl, whisk together the flour and salt. Pour in the activated yeast mixture along with the olive oil. Mix everything together using a wooden spoon or your hands until a rough dough forms and all the flour is incorporated.
- Knead the dough: Transfer the dough onto a lightly floured surface. Knead for about 8–10 minutes, pressing and folding the dough until it becomes smooth, elastic, and slightly tacky but not sticky. Add a little flour if needed, but avoid adding too much to keep the bread soft inside.
- First rise: Place the dough in a lightly oiled bowl, turning it once so the surface is coated. Cover with a clean kitchen towel or plastic wrap and let it rise in a warm place for 1 to 1 1/2 hours, or until it has doubled in size.
- Shape the loaf: Punch down the risen dough gently to release air. Shape it into a round or oval loaf, keeping the surface slightly tight for a nice crust. Place it on a baking sheet dusted with cornmeal to prevent sticking and to give a rustic texture to the bottom.
- Second rise: Cover the shaped dough loosely and let it rise again for 30–40 minutes until puffy. This second rise helps develop a light and airy interior.
- Bake the bread: Preheat your oven to 425°F (220°C). If desired, make a few shallow slashes on top of the dough with a sharp knife. Bake for 30–35 minutes until the crust is golden brown and the loaf sounds hollow when tapped on the bottom. For an extra crispy crust, you can place a small pan of water in the oven to create steam.
- Cool and serve: Remove the bread from the oven and let it cool on a wire rack for at least 20 minutes before slicing. This allows the interior to set properly and enhances the flavor. Slice and enjoy with olive oil, butter, or your favorite dishes.


Leave a Reply