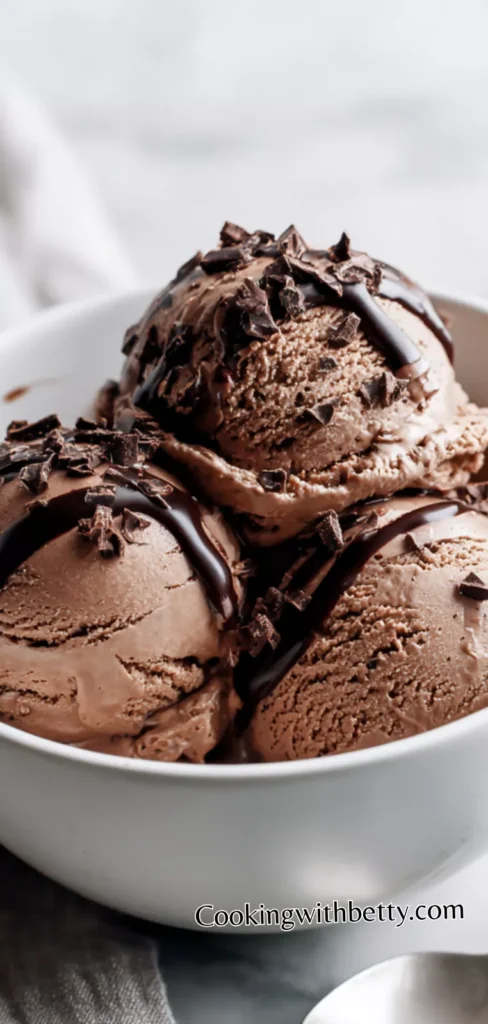
I love chocolate desserts, but I don’t always want all the extra sugar and cream in traditional ice cream. In this protein version, the frozen bananas give it a natural creaminess, and the chocolate protein powder makes it satisfyingly rich and chocolatey without guilt. The texture is soft, smooth, and scoopable, and you can make it in just a few minutes, which is amazing on busy days when I crave something sweet.
Chocolate ice cream is one of those treats that instantly brings a smile, but sometimes it feels too heavy or loaded with sugar. That’s why I love making Protein Chocolate Ice Cream at home — it’s creamy, indulgent, and packed with protein to keep me full and energized. This recipe is simple, quick, and perfect for anyone who wants a healthier dessert without sacrificing flavor.
I have tried a lot of healthy ice cream recipes over the years, and this one has quickly become my favorite. I use ripe frozen bananas, a good-quality chocolate protein powder, and a touch of almond milk to get the perfect soft-serve consistency. Always make sure your bananas are fully frozen — it really makes a difference in the creaminess of the ice cream.

You can serve it immediately as a soft-serve, sprinkle some dark chocolate chips on top, or even pair it with fresh berries or a drizzle of peanut butter. It also goes wonderfully with granola or crushed nuts for added texture and a little extra crunch.
Its Perfect For:
- A post-workout snack to refuel muscles
- A guilt-free dessert for chocolate lovers
- A healthy breakfast treat on busy mornings
- A refreshing snack on hot summer days
- Quick dessert when friends drop by
Ingredients
- 2 frozen ripe bananas, sliced
- 1 scoop chocolate protein powder (whey or plant-based)
- 2 tablespoons unsweetened cocoa powder
- 1/4 cup unsweetened almond milk (or any milk of choice, add more if needed)
- 1 tablespoon peanut butter or almond butter (optional, for creaminess)
- 1/2 teaspoon vanilla extract
- Pinch of salt
- Dark chocolate chips or cacao nibs (optional, for topping)
Kitchen Equipment You’ll Need
- High-speed blender or food processor
- Freezer-safe container
- Spatula for scraping down the blender
- Measuring cups and spoons
- Cutting board and knife for slicing bananas
How to Make Protein Chocolate Ice Cream
Step 1
Prepare the bananas: Peel ripe bananas, slice them into small pieces, and freeze for at least 3–4 hours or overnight. Frozen bananas are essential, as they create the thick, creamy texture that makes this ice cream feel indulgent without using real cream.
Step 2
Add ingredients to blender: Place the frozen banana slices into a high-speed blender or food processor. Add the chocolate protein powder, cocoa powder, vanilla extract, peanut butter (if using), and a small pinch of salt. Pour in the almond milk last to help the blades move smoothly.
Step 3
Blend until creamy: Start blending on low speed, then gradually increase to high. Stop occasionally to scrape down the sides and push the mixture toward the blades. If the mixture is too thick, add almond milk one tablespoon at a time until it becomes smooth and creamy, similar to soft-serve ice cream.
Step 4
Adjust flavor and texture: Taste the ice cream and adjust as needed. You can add a little more cocoa powder for deeper chocolate flavor, extra protein powder for thickness, or a drizzle of honey or maple syrup if you prefer it sweeter.
Step 5
Serve immediately or freeze: For soft-serve style, scoop and serve right away. For a firmer, scoopable texture, transfer the ice cream to a freezer-safe container and freeze for 30–45 minutes before serving.
Step 6
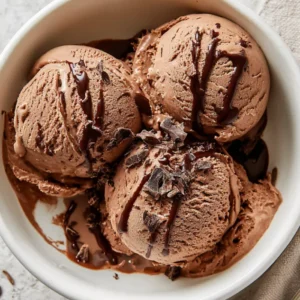
Finish and enjoy: Scoop into bowls and top with dark chocolate chips or cacao nibs for added crunch and extra chocolate flavor. Serve immediately and enjoy a rich, chocolatey protein dessert that feels indulgent but fits a healthy lifestyle.
Tips for the Best Protein Chocolate Ice Cream
- Use ripe bananas – The riper the banana, the sweeter and creamier your ice cream will be. Avoid green bananas, as they can taste starchy or bland.
- Freeze bananas properly – Slice bananas before freezing so they blend faster and create a smoother texture. Spread them on a tray to prevent sticking.
- Start with small milk amounts – Add almond milk gradually to avoid a runny ice cream. You can always add more if needed, but it’s easier to control consistency this way.
- Scrape down the sides – Stop blending halfway and push the mixture toward the blades. This ensures all chunks blend evenly and you get a silky texture.
- Taste and adjust – Add extra cocoa or protein powder gradually. You can also sweeten slightly with honey or maple syrup if needed, but start small.
- Serve immediately or chill – Soft-serve is best fresh, but freezing for 30–45 minutes gives a firmer scoopable texture. Perfect for portioning into bowls.
- Add mix-ins at the end – Fold in chocolate chips, nuts, or berries after blending to keep their texture. This avoids over-blending and preserves crunch or chewiness.
Optional Ingredients
- Peanut butter or almond butter for creaminess
- Maple syrup or honey for extra sweetness
- Cocoa nibs for a chocolatey crunch
- Coconut flakes for a tropical twist
- Vanilla extract for richer flavor
- Greek yogurt for extra protein and creaminess
How to Serve Protein Chocolate Ice Cream
I usually serve my protein chocolate ice cream in small bowls right after blending to enjoy it as soft-serve. The texture is velvety, creamy, and perfectly scoopable. I like to add a few toppings like dark chocolate chips, cacao nibs, or a light drizzle of peanut or almond butter to make each bite more interesting. It’s amazing how just a small topping can elevate the flavor and give it a dessert-like feel without adding too much sugar.
I sometimes get creative and layer the ice cream with fresh fruit, such as strawberries, blueberries, or banana slices, to create a parfait-style dessert. You can even sprinkle a little granola, crushed nuts, or coconut flakes on top for added crunch. This makes it feel like a full indulgent dessert while still keeping it healthy and satisfying.
I also love preparing it in advance and storing it in a freezer-safe container for a few hours. Then, I let it sit at room temperature for 5–10 minutes before serving so it softens slightly and is easier to scoop. For family nights or small gatherings, I set out bowls, toppings, and spoons so everyone can customize their ice cream exactly how they like it. It’s fun, interactive, and makes a simple protein dessert feel extra special.
Is Protein Chocolate Ice Cream Healthy?
Absolutely! This ice cream is a healthier alternative to traditional ice cream because it uses natural sweetness from bananas and protein powder instead of refined sugar. It provides a good dose of protein, making it a great post-workout snack or a filling treat.
It also contains nutrients from the bananas, such as potassium and fiber, and you can easily control the ingredients based on your dietary needs. Using plant-based milk or adding nut butter can further boost healthy fats without adding unnecessary sugar. Overall, it’s a dessert that satisfies cravings while supporting your wellness goals.
Variations and Substitutions
- Peanut Butter Chocolate Ice Cream – Add 1–2 tablespoons of peanut butter while blending. The flavor blends beautifully with chocolate and adds a creamy texture. Top with crushed peanuts for extra crunch.
- Mocha Protein Ice Cream – Stir in 1 teaspoon instant coffee granules. The subtle coffee flavor pairs perfectly with chocolate for a sophisticated dessert or morning snack.
- Mint Chocolate Ice Cream – Add a few drops of peppermint extract. The fresh mint flavor feels indulgent and refreshing. Garnish with chocolate shavings for extra flair.
- Chocolate Banana Swirl – Blend half the ice cream plain, half with extra cocoa powder. Layer in a container to create a fun swirl pattern that’s visually appealing and delicious.
- Berry Chocolate Ice Cream – Add 1/4 cup frozen berries while blending. The tartness of berries balances the chocolate sweetness and adds vibrant color for presentation.
- Vegan Protein Chocolate Ice Cream – Use plant-based chocolate protein powder and coconut milk. Completely dairy-free but still creamy and rich.
- Chocolate Almond Crunch – Fold in 2 tablespoons chopped almonds or almond butter. Adds nutty flavor and crunch for a more textured ice cream.
- Double Chocolate Chip – Fold in 1–2 tablespoons dark chocolate chips after blending. Extra chocolatey without overpowering the base, perfect for chocoholics.
How to Store and Reheat
Store leftover ice cream in a freezer-safe container with a tight-fitting lid. It can last up to 2 weeks, though it’s best eaten within a few days for optimal creaminess. Place a piece of parchment or plastic wrap directly on the ice cream to prevent ice crystals.
To serve later, let the ice cream sit at room temperature for 5–10 minutes. This softens it slightly and makes scooping easier. Avoid microwaving, as it will melt unevenly and affect texture. Stir gently before serving to restore smooth consistency.
Frequently Asked Questions About Protein Chocolate Ice Cream
Can I use other fruits instead of bananas?
Yes! Bananas provide natural sweetness and creaminess, but mango, avocado, or cooked sweet potato can work too. Be aware that some fruits might change the flavor slightly, so you may need extra cocoa or protein powder to balance the chocolate taste.
Do I need a high-speed blender?
It’s highly recommended for smooth, creamy ice cream. Standard blenders can work, but you may need to blend longer and scrape sides often. You might end up with a slightly chunkier texture, so patience is key.
Can I make this without protein powder?
Yes, it will still be creamy and delicious, but without the extra protein boost. To enhance flavor and richness, add more cocoa powder, a little nut butter, or vanilla extract. This keeps it indulgent while maintaining healthiness.
How long does it take to freeze the bananas?
Bananas need at least 3–4 hours frozen for proper creaminess. Overnight freezing is best for firmer texture. Fully frozen bananas are what give the ice cream its soft-serve feel.
Protein Chocolate Ice Cream
Ingredients
- 2 frozen ripe bananas sliced
- 1 scoop chocolate protein powder whey or plant-based
- 2 tablespoons unsweetened cocoa powder
- 1/4 cup unsweetened almond milk or any milk of choice, add more if needed
- 1 tablespoon peanut butter or almond butter optional, for creaminess
- 1/2 teaspoon vanilla extract
- Pinch of salt
- Dark chocolate chips or cacao nibs optional, for topping
Instructions
- Prepare the bananas: Peel ripe bananas, slice them into small pieces, and freeze for at least 3–4 hours or overnight. Frozen bananas are essential, as they create the thick, creamy texture that makes this ice cream feel indulgent without using real cream.
- Add ingredients to blender: Place the frozen banana slices into a high-speed blender or food processor. Add the chocolate protein powder, cocoa powder, vanilla extract, peanut butter (if using), and a small pinch of salt. Pour in the almond milk last to help the blades move smoothly.
- Blend until creamy: Start blending on low speed, then gradually increase to high. Stop occasionally to scrape down the sides and push the mixture toward the blades. If the mixture is too thick, add almond milk one tablespoon at a time until it becomes smooth and creamy, similar to soft-serve ice cream.
- Adjust flavor and texture: Taste the ice cream and adjust as needed. You can add a little more cocoa powder for deeper chocolate flavor, extra protein powder for thickness, or a drizzle of honey or maple syrup if you prefer it sweeter.
- Serve immediately or freeze: For soft-serve style, scoop and serve right away. For a firmer, scoopable texture, transfer the ice cream to a freezer-safe container and freeze for 30–45 minutes before serving.
- Finish and enjoy: Scoop into bowls and top with dark chocolate chips or cacao nibs for added crunch and extra chocolate flavor. Serve immediately and enjoy a rich, chocolatey protein dessert that feels indulgent but fits a healthy lifestyle.

Leave a Reply