Making Witch Finger Cookies is the most thrilling Halloween baking project that transforms simple butter cookies into eerily realistic witch fingers, complete with knuckles and bloody fingernails. These spooky treats never fail to steal the show at Halloween parties, creating that perfect mix of disgust and delight when guests realize these creepy fingers are actually delicious almond-flavored cookies.
Every October, my kitchen becomes a witch’s workshop where flour-dusted counters and red jam “blood” create these grotesque yet irresistible treats that have everyone asking for the recipe.
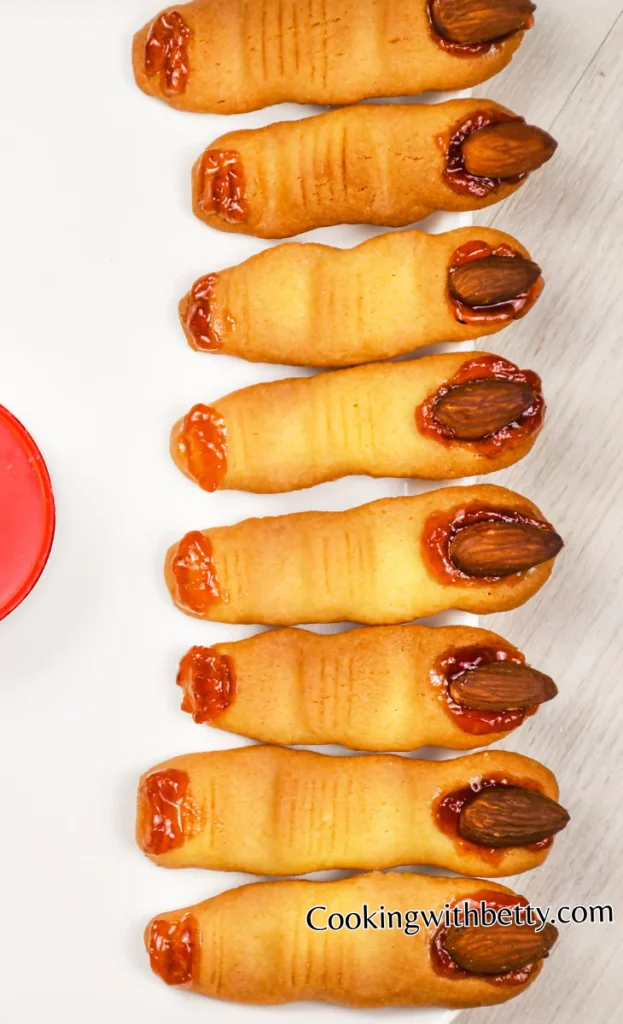
You can serve about twenty-four fingers from this batch, perfect for a classroom party or Halloween gathering where everyone wants to try these famous creepy cookies. Some years, I double the recipe because they disappear so quickly, and this has become the treat my kids’ friends specifically request every Halloween season.
What I LOVE about this recipe:
- Creates the most realistic-looking Halloween cookies ever
- Simple ingredients but spectacular spooky results
- Kids shriek with delight when they see them
- Perfect activity for Halloween baking with children
- Stores beautifully for make-ahead party planning
Ingredients
- 1 cup (2 sticks) unsalted butter, softened
- 1 cup powdered sugar
- 1 large egg
- 1 teaspoon vanilla extract
- 1 teaspoon almond extract
- 2¾ cups all-purpose flour
- 1 teaspoon baking powder
- 1 teaspoon salt
- 24 whole blanched almonds
- Red decorating gel or seedless raspberry jam
- Green food coloring (optional)
Kitchen Equipment You’ll Need
- Electric mixer or hand mixer
- Large mixing bowl
- Measuring cups and spoons
- Baking sheets (2-3)
- Parchment paper
- Sharp paring knife
- Wire cooling rack

How to make Witch Finger Cookies
Step 1
In a large bowl, beat softened butter and powdered sugar until light and fluffy, about 3 minutes. Add egg, vanilla extract, and almond extract, mixing until well combined.
Step 2
In a separate bowl, whisk together flour, baking powder, and salt. Gradually add to butter mixture, mixing until dough comes together. Add 2-3 drops of green food coloring if desired for a creepy color.
Step 3
Cover the dough and refrigerate it for 30 minutes to make it easier to handle.
Step 4
Preheat oven to 325°F (160°C). Line baking sheets with parchment paper.
Step 5
Take about 1 tablespoon of dough and roll into a 3-4 inch finger shape. Make it slightly thinner in the middle for the knuckle. Use a knife to make 3-4 horizontal cuts on top for knuckle wrinkles.
Step 6
Press an almond firmly onto one end of each finger for the fingernail. Squeeze the finger tip slightly to make the nail look embedded.
Step 7
Use a knife to make small vertical cuts below the almond for cuticles. Make additional horizontal lines on the fingers for more knuckle definition.
Step 8
Place on prepared baking sheets about 2 inches apart. Bake for 12-15 minutes until very lightly golden on the bottom but still pale on top.
Step 9
Remove from oven and immediately remove almonds. Add a small amount of red gel or jam where the almond was and replace the almond, letting some “blood” ooze out. Add extra “blood” at the knuckles if desired.
Step 10
Let cool on the baking sheet for 5 minutes, then transfer to a wire rack. Store in an airtight container.
Helpful Tips
Chill That Dough: Cold dough is essential for maintaining finger shapes during baking. Work with small portions, keeping the rest refrigerated while shaping each batch.
Size Matters: Make fingers different lengths for a realistic variety. Remember cookies spread slightly, so make them thinner than you think.
Knuckle Details: Press firmly when making knuckle lines so they remain visible after baking. Make three sets of lines for the most realistic knuckle appearance.
Almond Placement: Press almonds on at a slight angle, like real fingernails grow. Remove and reattach with jam immediately after baking while cookies are warm.
Blood Effects: Less is more with jam – tiny amounts look most realistic. Let some ooze from under nails and in knuckle crevices naturally.
Optional Ingredients
- Green or purple food coloring for zombie effect
- Black cocoa powder for dark witch fingers
- Sliced almonds as an alternative to fingernails
- Strawberry jam instead of raspberry
- Edible pearl dust for ghostly shimmer
- Chocolate chips for warts (press in before baking)
How to Enjoy Witch Finger Cookies
One of my favorite presentation tricks is arranging these fingers reaching out of a “grave” made from crushed chocolate cookies in a serving dish, creating a scene that makes everyone gasp before laughing.
I love displaying them in a vintage glove box lined with black tissue paper, or standing them upright in a glass jar filled with orange and black candy corn so they look like they’re clawing their way out. For parties, I arrange them on platters decorated with plastic spiders and fake cobwebs, sometimes adding dry ice nearby for that spooky fog effect that really sets the Halloween mood.
The beauty of these cookies lies in their versatility for different Halloween occasions and age groups. At adult parties, I serve them alongside blood-red cocktails or witch’s brew punch, arranging fingers around the punch bowl rim like they’re crawling out.
For children’s parties, I create a less scary presentation by making them more colorful with different food coloring or serving them in Halloween-themed cupcake liners with fun labels like “Wicked Witch Wanda’s Fingers” or “Zombie Zelda’s Digits.”

Is Witch Finger Cookies Healthy?
While Witch Finger Cookies are definitely treats meant for special occasions rather than everyday snacking, they’re not the worst Halloween option when enjoyed moderately. Made primarily from butter, flour, and sugar, they provide quick energy but are high in saturated fat and simple carbohydrates. The almonds add small amounts of protein, healthy fats, and vitamin E, making these slightly more nutritious than pure candy. At about 95 calories per cookie, they’re reasonably portioned compared to many Halloween treats.
To make them somewhat healthier, you could substitute half the all-purpose flour with whole wheat pastry flour, reduce sugar slightly, or use coconut oil instead of some butter, though these changes will affect texture and taste.
Variations and Substitutions To Try
Gluten-Free Fingers: Replace regular flour with cup-for-cup gluten-free flour blend for celiac-safe version. Add extra egg yolk to help with binding since gluten-free dough can be crumbly. Chill the dough longer, as gluten-free versions are stickier and harder to shape. Texture is slightly more delicate but still delicious. These fool everyone at mixed dietary parties.
Vegan Witch Fingers: Use vegan butter and replace the egg with flax egg or applesauce. Substitute almonds with pumpkin seeds for a nut-free option, too. Maple syrup mixed with beet juice creates a perfect blood effect. Texture is slightly denser but equally spooky. Kids with allergies finally get to enjoy these.
Chocolate Fingers: Add 1/4 cup cocoa powder to the dough for the chocolate version. Use white chocolate chips as fingernails for contrast. Drizzle with chocolate sauce instead of jam for blood. Creates “mummy” or “zombie” fingers perfectly. These disappear even faster than the original.
Shortbread Style: Replace some flour with cornstarch for a melt-in-mouth texture. Use only butter, no egg, for true shortbread consistency. Press designs with a fork for fancy knuckles. More delicate and buttery than the original. Perfect for adult Halloween tea parties.
Savory Cheese Fingers: Make with cheese cookie dough using sharp cheddar and herbs. Use pumpkin seeds for nails and tomato paste for blood. Serve as an appetizer instead of dessert. Surprisingly delicious and unexpected. Great for those who prefer savory treats.
Rainbow Zombie Fingers: Divide the dough and color each portion differently for a tie-dye effect. Creates psychedelic zombie fingers perfect for fun parties. Kids love choosing their favorite colors. Instagram-worthy and taste great too. Modern twist on classic recipe.
How to Store
Store Witch Finger Cookies in airtight containers at room temperature for up to one week, layering between parchment paper to prevent sticking and preserve decorative details. Keep any cookies with jam decoration separate from plain ones, as moisture from the jam can make the others soft. For the best appearance, add fresh jam “blood” just before serving if the cookies were stored plain.
For longer storage, freeze unbaked shaped fingers on baking sheets until solid, then transfer to freezer bags for up to three months. When ready to serve, bake directly from frozen, adding 2-3 minutes to baking time, then decorate as usual with almonds and jam while warm for the freshest appearance and taste.
FAQ
Why did my fingers spread too much during baking? Your dough was likely too warm or the butter too soft when shaping. Always chill the dough for 30 minutes before shaping, and work quickly. If fingers are still spread, freeze shaped cookies for 10 minutes before baking.
Can I make these without almonds for nut allergies? Absolutely! Use pumpkin seeds, sunflower seeds, or even white chocolate chips for fingernails. You can also pipe white icing to create nail shapes. Many people actually prefer the pumpkin seed version.
My almond nails keep falling off – help! Press almonds firmly into the dough before baking so they create an indent. After baking, immediately remove almonds while cookies are warm, add jam as “glue,” then reattach. The jam acts as an edible adhesive.
Why are my cookies hard instead of tender? Overmixing develops gluten, making cookies tough, or you may have added too much flour. Mix just until combined and measure flour correctly by spooning into measuring cup, not scooping. Als,o avoid overbaking.
Witch Finger Cookies
Ingredients
- 1 cup 2 sticks unsalted butter, softened
- 1 cup powdered sugar
- 1 large egg
- 1 teaspoon vanilla extract
- 1 teaspoon almond extract
- 2¾ cups all-purpose flour
- 1 teaspoon baking powder
- 1 teaspoon salt
- 24 whole blanched almonds
- Red decorating gel or seedless raspberry jam
- Green food coloring optional
Instructions
- In a large bowl, beat softened butter and powdered sugar until light and fluffy, about 3 minutes. Add egg, vanilla extract, and almond extract, mixing until well combined.
- In a separate bowl, whisk together flour, baking powder, and salt. Gradually add to butter mixture, mixing until dough comes together. Add 2-3 drops green food coloring if desired for a creepy color.
- Cover dough and refrigerate for 30 minutes to make it easier to handle.
- Preheat oven to 325°F (160°C). Line baking sheets with parchment paper.
- Take about 1 tablespoon of dough and roll into a 3-4 inch finger shape. Make it slightly thinner in the middle for the knuckle. Use a knife to make 3-4 horizontal cuts on top for knuckle wrinkles.
- Press an almond firmly onto one end of each finger for the fingernail. Squeeze finger tip slightly to make the nail look embedded.
- Use a knife to make small vertical cuts below the almond for cuticles. Make additional horizontal lines on the fingers for more knuckle definition.
- Place on prepared baking sheets about 2 inches apart. Bake for 12-15 minutes until very lightly golden on the bottom but still pale on top.
- Remove from oven and immediately remove almonds. Add a small amount of red gel or jam where the almond was and replace the almond, letting some “blood” ooze out. Add extra “blood” at the knuckles if desired.
- Let cool on baking sheet for 5 minutes, then transfer to wire rack. Store in airtight container.

Leave a Reply