My husband is a big fan of sweets, but he also cares about staying fit, so finding desserts that taste indulgent but aren’t full of empty calories has been tricky. In our journey to healthier living, this ice cream became a favorite in our home. The combination of creamy vanilla, a touch of natural sweetness, and the boost of protein makes it perfect for anytime you crave dessert without the guilt.
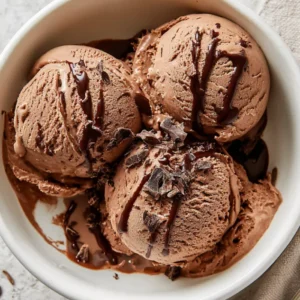
When it comes to desserts, I’ve always loved ice cream, but I’ve struggled to find options that are both creamy and protein-packed. Most store-bought ice creams are loaded with sugar and additives, and they leave me feeling guilty after just a few bites. That’s why I started making Protein Vanilla Ice Cream at home, and it has completely changed my dessert game. Not only is it satisfying and smooth, but it’s also a healthy twist on a classic favorite.
I have tried several homemade ice cream recipes, but this one stands out. I use unsweetened almond milk, high-quality vanilla protein powder, and a touch of honey. Always mixing thoroughly ensures the protein powder dissolves completely, giving a smooth texture without any graininess. It’s simple, quick, and the results are always creamy and delicious.
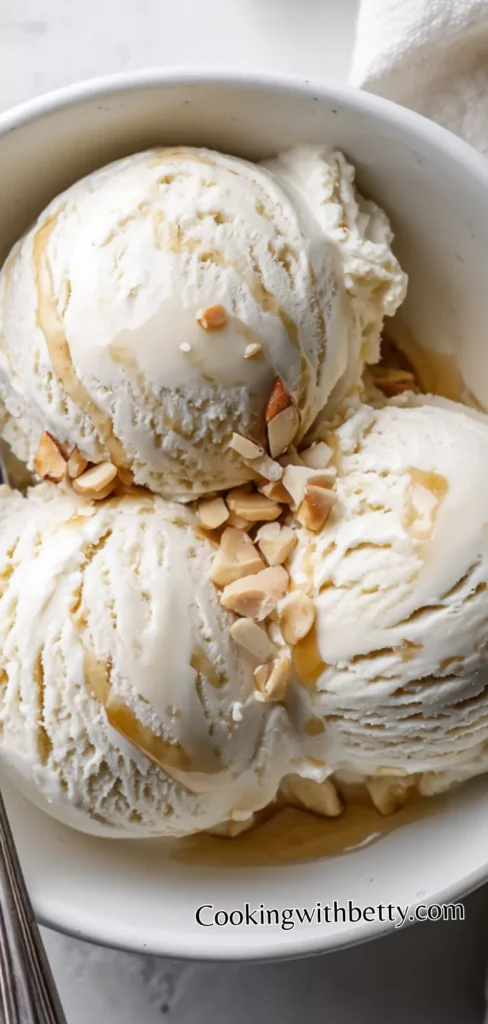
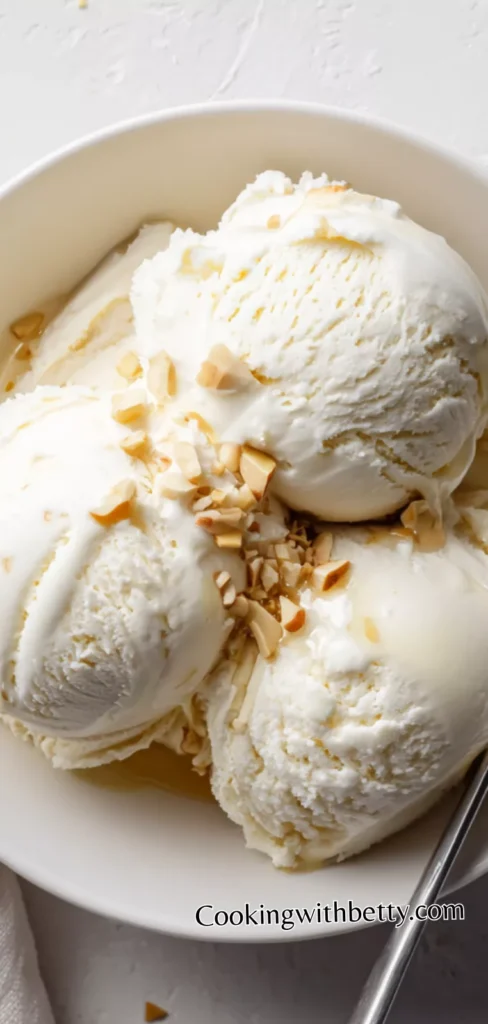
You can serve this ice cream in a bowl with fresh berries, some chopped nuts, or even with a drizzle of sugar-free chocolate syrup. It’s also lovely in a waffle cone or paired with a warm brownie for a healthier indulgence. For breakfast or post-workout snacks, it works just as well, giving you that sweet flavor and extra protein.
It’s Perfect For:
- Post-workout snack: A protein boost after exercise
- Healthy dessert: Guilt-free treat any day
- Summer refreshment: Cool and creamy on hot days
- Breakfast treat: With granola or fruits
- Kid-friendly snack: Sweet, creamy, and nutritious
Ingredients
- 2 cups unsweetened almond milk (or any milk of choice)
- 1/2 cup vanilla protein powder (whey or plant-based)
- 2 tablespoons honey or maple syrup (adjust to taste)
- 1 teaspoon pure vanilla extract
- Pinch of salt
- Optional mix-ins: dark chocolate chips, crushed nuts, or berries
Kitchen Equipment You’ll Need
- Ice cream maker (optional, but best for texture)
- Medium mixing bowl
- Whisk
- Measuring cups and spoons
- Freezer-safe container
- Spatula for folding mix-ins
- Spoon or ice cream scooper for serving
How to Make Protein Vanilla Ice Cream
Step 1
Prepare the base: In a medium mixing bowl, combine the milk, vanilla protein powder, honey, vanilla extract, and a pinch of salt. Whisk thoroughly until the protein powder is fully dissolved and the mixture is smooth with no lumps. Tasting at this point can help you adjust sweetness if needed.
Step 2
Chill slightly: For best texture, refrigerate the mixture for 15–20 minutes before freezing. This allows the flavors to meld together and helps the ice cream freeze more evenly.
Step 3
Freeze the ice cream: Pour the mixture into an ice cream maker and churn according to the manufacturer’s instructions, usually about 20–25 minutes until it reaches a soft-serve consistency. If you don’t have an ice cream maker, pour the mixture into a freezer-safe container and stir every 30–40 minutes for 3–4 hours to break up ice crystals for a creamy texture.
Step 4
Add mix-ins (optional): During the last 5 minutes of churning (or after the first 2 hours if using the freezer method), fold in chocolate chips, crushed nuts, or berries for added texture and flavor.
Step 5
Set and serve: Transfer the ice cream to a lidded container and freeze for an additional 1–2 hours if you prefer a firmer consistency. Scoop into bowls or cones and enjoy immediately. For an extra touch, drizzle with sugar-free chocolate syrup or sprinkle with cinnamon for flavor contrast.
Tips for Perfect Protein Vanilla Ice Cream
- Use chilled milk: I always chill my milk before mixing. This helps the ice cream freeze faster and gives a smoother texture.
- Dissolve protein powder well: Whisk thoroughly to prevent lumps. Smooth ice cream is always more enjoyable.
- Adjust sweetness gradually: Taste the mixture before freezing. You can add more honey or syrup slowly for perfect balance.
- Add mix-ins at the end: If you want chocolate chips or nuts, fold them in after churning. This prevents sinking.
- Freeze in shallow containers: It freezes faster and makes scooping easier.
- Use high-quality vanilla extract: It really enhances the flavor and makes the ice cream taste richer.
- Serve slightly softened: Take out 5–10 minutes before serving. It’s creamy and easy to scoop without melting too fast.
Optional Ingredients
- Dark chocolate chips
- Crushed almonds or walnuts
- Fresh or frozen berries
- Cinnamon or nutmeg for flavor
- Unsweetened shredded coconut
- Sugar-free caramel or chocolate drizzle
How to Serve Protein Vanilla Ice Cream
I love serving Protein Vanilla Ice Cream in simple bowls with fresh fruit on top. It adds natural sweetness, bright colors, and a light, refreshing contrast to the creamy ice cream. Sometimes I sprinkle a few nuts or granola to give it a crunchy texture that makes every bite more interesting.
I also enjoy scooping it into a waffle cone for a treat that feels like a traditional ice cream, but much healthier. It’s perfect for kids or guests who don’t even realize it’s protein-rich. I often drizzle sugar-free chocolate or caramel syrup for a touch of indulgence without adding too much sugar.
Sometimes I serve it alongside warm desserts like a baked apple, a soft brownie, or a slice of banana bread. The contrast between the warm dessert and cold creamy ice cream is just irresistible. I also like pairing it with a hot drink, like coffee or herbal tea, to create a cozy snack that feels special.
I also enjoy using it as a topping for smoothie bowls or pancakes. Just a small scoop adds flavor and protein to breakfast or post-workout snacks. You can layer it with fresh fruits and seeds for a colorful, Instagram-worthy presentation that’s as healthy as it is tasty.
Is Protein Vanilla Ice Cream Healthy?
Yes, Protein Vanilla Ice Cream is healthy when made with natural, minimally processed ingredients. It provides extra protein, which helps with muscle recovery and keeps you full longer than regular ice cream.
Because it’s low in added sugar and uses unsweetened milk alternatives, it’s also suitable for those managing their sugar intake. Enjoying a small portion can satisfy your sweet tooth without sabotaging your health goals.
Variations and Substitutions
- Chocolate Protein Ice Cream: Replace vanilla protein powder with chocolate. Add cocoa powder for richer flavor.
- Strawberry Protein Ice Cream: Fold in fresh or frozen strawberries during the last minutes of churning. Sweet and fruity.
- Peanut Butter Protein Ice Cream: Add 2 tablespoons natural peanut butter. Creamy, nutty, and delicious.
- Vegan Option: Use plant-based protein powder and coconut milk. Still creamy and rich.
- Coffee Protein Ice Cream: Dissolve instant coffee in milk before mixing. Perfect for a caffeinated treat.
- Cinnamon Swirl: Add 1 teaspoon cinnamon and swirl honey for warmth. Cozy and flavorful.
- Chocolate Chip: Fold in sugar-free chocolate chips for crunch. Keeps ice cream fun to eat.
- Berry Swirl: Mix in a berry puree in layers for a pretty swirl. Tastes fruity and refreshing.
How to Store, How to Reheat
Store Protein Vanilla Ice Cream in an airtight container in the freezer. Make sure the surface is smooth and cover with parchment or plastic wrap to prevent ice crystals. Properly stored, it can last up to two weeks without losing flavor.
If it becomes too hard, allow it to sit at room temperature for 5–10 minutes before scooping. This softens the ice cream slightly for perfect texture. Never microwave, as it can ruin the creamy consistency. Always scoop gently to preserve the smooth texture.
Frequently Asked Questions About Protein Vanilla Ice Cream
Can I make this without an ice cream maker?
Yes! Pour the mixture into a shallow freezer-safe container and stir every 30–40 minutes for 3–4 hours. This breaks up ice crystals, giving a smooth, creamy texture. It won’t be exactly like churned ice cream, but it’s still delicious.
Can I use other protein powders?
Absolutely! Whey, casein, or plant-based protein powders all work. Just make sure to adjust the sweetness, as some powders are already flavored or sweetened. A little extra vanilla extract can balance the flavor.
Can I make it sugar-free?
Yes. Replace honey or maple syrup with a sugar-free sweetener like stevia, monk fruit, or erythritol. Taste the mixture before freezing to ensure it’s sweet enough, and adjust gradually.
Can I add fruit?
Definitely! Fresh or frozen fruits like strawberries, blueberries, or raspberries can be folded in during the last minutes of churning. If using the freezer-only method, stir in fruit about halfway through freezing. It adds natural flavor and extra nutrients.

Protein Vanilla Ice Cream
Ingredients
- 2 cups unsweetened almond milk or any milk of choice
- 1/2 cup vanilla protein powder whey or plant-based
- 2 tablespoons honey or maple syrup adjust to taste
- 1 teaspoon pure vanilla extract
- Pinch of salt
- Optional mix-ins: dark chocolate chips crushed nuts, or berries
Instructions
- Prepare the base: In a medium mixing bowl, combine the milk, vanilla protein powder, honey, vanilla extract, and a pinch of salt. Whisk thoroughly until the protein powder is fully dissolved and the mixture is smooth with no lumps. Tasting at this point can help you adjust sweetness if needed.
- Chill slightly: For best texture, refrigerate the mixture for 15–20 minutes before freezing. This allows the flavors to meld together and helps the ice cream freeze more evenly.
- Freeze the ice cream: Pour the mixture into an ice cream maker and churn according to the manufacturer’s instructions, usually about 20–25 minutes until it reaches a soft-serve consistency. If you don’t have an ice cream maker, pour the mixture into a freezer-safe container and stir every 30–40 minutes for 3–4 hours to break up ice crystals for a creamy texture.
- Add mix-ins (optional): During the last 5 minutes of churning (or after the first 2 hours if using the freezer method), fold in chocolate chips, crushed nuts, or berries for added texture and flavor.
- Set and serve: Transfer the ice cream to a lidded container and freeze for an additional 1–2 hours if you prefer a firmer consistency. Scoop into bowls or cones and enjoy immediately. For an extra touch, drizzle with sugar-free chocolate syrup or sprinkle with cinnamon for flavor contrast.
Leave a Reply